The Complete Guide to Understanding Qlik Sense Certificates
If you are a Qlik Sense developer or architect, you have certainly heard of Qlik Sense certificates. Qlik Sense certificates are important for the operation of Qlik Sense and for communication between Qlik Sense services and with third-party solutions.
In this post, we are going to see together everything you should know about Qlik Sense certificates. You will understand their roles and know how to use and manage them over time.
1- What is a Certificate
A certificate is a data file that contains keys used to encrypt communication between a client and a server in a domain. Certificates also confirm that the domain is known to the organization that issued the certificate. A certificate includes information about the identity of the owner and the digital signature of an organization that has verified that the contents of the certificate are correct. The key pair (public and private keys) is used to encrypt the communication.
Qlik Sense uses certificates to communicate with different Qlik products. It also uses certificates for communication between components installed on different computers.
Qlik Sense certificates are also essential for communicating with third-party solutions like Qalyptus.
2- Qlik Sense certificates
Certificates are used in a Qlik Sense site to authenticate communication between services that reside on different nodes. Certificates can also be used to create a trusted domain between services located in different domains or zones.
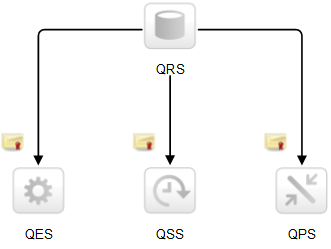
The architecture is based on the main Qlik Sense Repository Service (QRS) on the central node acting as a certificate manager. The master QRS creates and distributes certificates to all nodes of a site: Qlik Sense Engine Service (QES), Qlik Sense Scheduler Service (QSS) and Qlik Sense Proxy Service (QPS).
Qlik Sense certificates are made up of three certificates:
Customer certificate (Customer)
The client certificate is located in the following location in the Microsoft Windows certificate store: Current user> Personal> Certificates
Important, this certificate is linked to the user who runs Qlik Sense services. If you change the user who runs Qlik Sense services you must install the “Client” certificate for this new user.
Server certificate (Server)
The server certificate is located in the following location in the Microsoft Windows certificate store: Local computer> Personal> Certificates
The “Server” certificate is linked to the machine where Qlik Sense is installed.
Root certificate
The root certificate is located in the following places in the Microsoft Windows certificate store:
Current User> Trusted Root Certification Authorities> Certificates
Local computer> Trusted Root Certification Authorities> Certificates
This certificate is installed at the machine level and at the user level that runs Qlik Sense services.
3- Qlik Sense certificates and third-party solutions
Qlik Sense has an API for each of its services. To communicate with Qlik Sense via APIs, it is necessary to use certificates in order to secure exchanges.
If you want to use a third-party solution like Qalyptus to extend the capabilities of Qlik Sense, it is necessary to ensure that the Qlik Sense certificates are installed on the machine where the third-party solution is installed. If this solution is installed on the same machine as Qlik Sense, you must not install the certificates again; we will see why!
4- Install certificates
To install Qlik Sense certificates on another machine, you must first export them from Qlik Sense QMC. Certificates can be installed manually or using a user interface if you are installing certificates for a third-party solution and that solution has a certificate installation interface.
Export certificates
Follow the steps below to export the certificates:
- Connect to the Qlik Sense QMC
- Select Certificates on the QMC start page
- The export certificate page is displayed
- Click on Add machine name to add a new box
- In the Machine name box, type the full name of the computer where you want to install the certificates (machineName.domain.com) or the IP address
- Enter a password in the fields: Certificate password and Retype password. This is not mandatory.
- Check the Include secret key checkbox
- Click on Export certificates
When the export is complete, the following message appears: Certificates exported.
The certificates will be exported to a disk location and the path is displayed. In the folder, the following certificates are created: client.pfx, root.cer, server.pfx. If the export fails, the following message is displayed: Certificates export could not complete.
Install certificates
As a reminder, Qlik Sense certificates are made up of three files: client.pfx, root.cer, server.pfx which must be installed in different stores (see section: Qlik Sense certificates).
The easiest way to properly install Qlik Sense certificates is to use the Qalyptus certificate installer. This installer not only allows you to install the certificates but also to check if old certificates are present and offers to delete them before installing the new certificates.
You can download and use the Qalyptus certificate installer for free. Click here to download.
Once downloaded, you just need to launch it (no installation required) and specify the path to the three files previously exported and click on Install certificates.
Please note that installing certificates requires admin rights on the machine.
5- Recreate Qlik Sense certificates
If you have problems accessing the Qlik Sense Hub or QMC due to certificates, you can recreate Qlik Sense certificates to resolve the issue. This kind of error can occur if for example you have installed the exported certificates from Qlik Sense on the machine where Qlik Sense is installed.
In the case of a Qlik Sense Cluster installation, check which node is the central node before continuing. This can be done by consulting the Nodes menu in the QMC. Check which node is marked as the center node.
The instructions below should be executed only on the master (central) nodes.
Do not perform the steps below in a production environment without first backing up existing certificates.
Use the following instructions to recreate the certificates:
1- In Certificates (Local Computer) > Trusted Root Certification Authorities > Certificates, delete all the Self-Signed certificates created by Qlik Sense, issued by HOSTNAME.domain-CA*
*Where HOSTNAME is machine name of the server in question and domain is the domain the server.
So for example, QlikServer1 is the computer hostname and the domain is domain.local, the certificate will be issued by QlikServer1.domain.local-CA
2- In Certificates (Local Computer) > Personal > Certificates, delete all the Self-Signed certificates issued by HOSTNAME.domain-CA
3-In Certificates > Current User > Personal > Certificates, delete all the Self-Signed certificates named QlikClient
4-Go to the folder C:\ProgramData\Qlik\Sense\Repository, delete the folder ‘Exported Certificates’
5- Open CMD with admin privileges and run this command to create new certificates:
“C:\Program Files\Qlik\Sense\Repository\Repository.exe” -bootstrap -iscentral -restorehostname
Note: If the script doesn’t get to “Bootstrap mode has terminated. Press ENTER to exit…” and gets stuck at “[INFO] Entering main startup phase…” start the “Qlik Sense dispatcher service” and it will get to the end)
6- Verify the new certificates have been created by REFRESHING the screen for each certificate location. In addition, verify that duplicate or multiple certificates were not created (rarely occurs). If so, the article will need to be followed again by starting with the deletion of the certificates.
7-Restart all Qlik Sense Services and wait few minutes.
Now you have all the necessary information regarding Qlik Sense certificates. If you need more information, I recommend that you consult the Qlik Sense technical documentation or contact Qlik support.
Consider sharing this article!